Showing posts with label Gel-a-tins. Show all posts

11.14.2018

Country Chic Christmas Countdown


Glue Dots Adhesives
This project was created for Glue Dots ® and is published on their blog.
A brightly colored Advent Calendar is a great and fun way for the family to count down to Christmas! Using some coordinating colors and papers makes this project the perfect, functional decoration for the up-coming holiday.
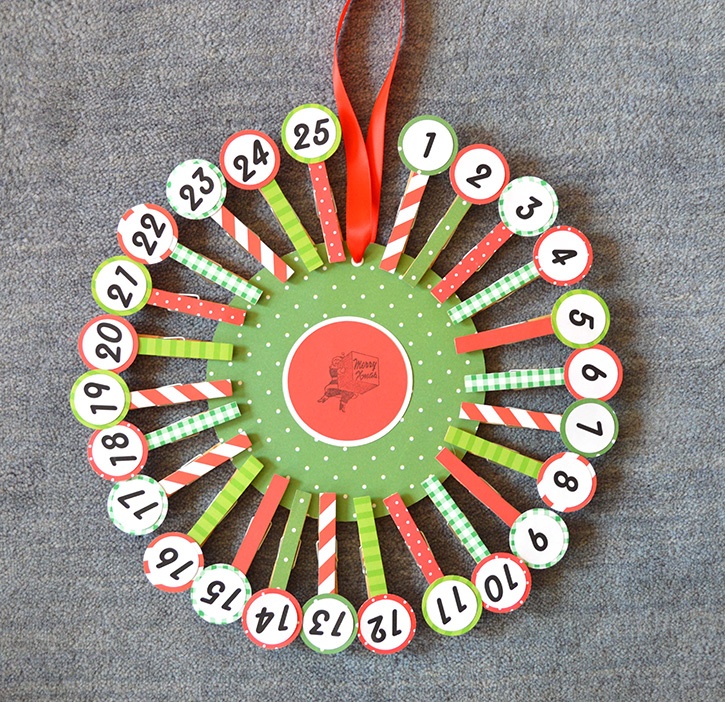
 country-chic-count-down-to-christmas-calendar-glue-dots-finished
Made by: Dawn Mercedes Barrett
Time:  45 minutes
Level:  Moderate Handiness
Size:  15" x 15" 
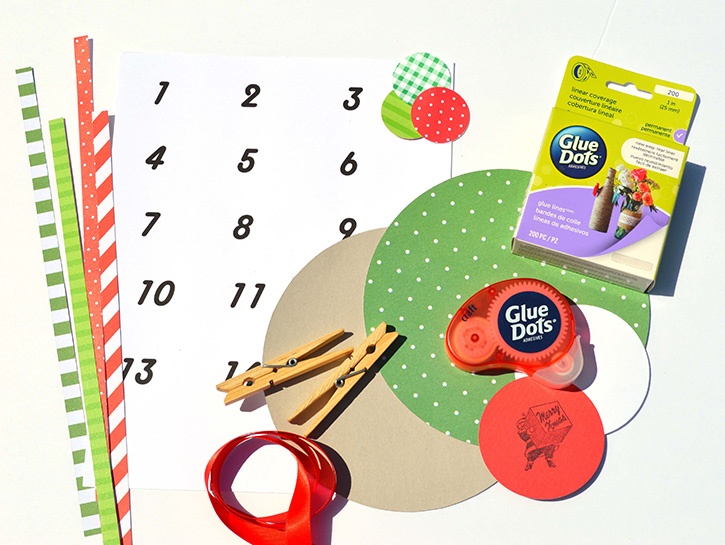
 country-chic-count-down-to-christmas-calendar-glue-dots-supplies

Supplies:
  • Glue Lines®
  • Craft Dots™
  • Permanent GlueTape
  • Christmas inspired/colored patterned paper
  • White card stock
  • Santa Stamps (if desired)
  • Momento Dye Ink (optional) 
  • 25 wooden clothes pins
  • 24 inches of red satin ribbon (1/2 inch wide)
  • Chipboard 
  • Pencil/paper
  • Paper Trimmer
  • Electronic diecut machine
  • 1.25 and 1.5 inch paper punches
  • Crop-a-dile
  • Eyelet
  • Scissors
  • Countdown numbers
Directions:
Using your electronic diecut machine, cut out a 7” circle from your chipboard and one from a Christmas patterned paper. 
Tip:  The back of a paper pack has a great piece of chipboard/cardboard that is perfect for this project!
Continue to cut out a 3.25” white card stock circle and a 3” circle out of contrasting patterned paper.  Stamp a Santa or snowman image on the smallest circle, if desired.  Glue together all circles in a concentric pattern using the GlueTape ®.
Cut patterned paper into ¾” strips. These will be used to cover the wooden clothes pins. Use 1” Glue Lines ® to adhere the paper to the clothes pin. Then trim off the excess using scissors. I re-used the strips until I ran out and cut more as needed.country-chic-count-down-to-christmas-calendar-glue-dots
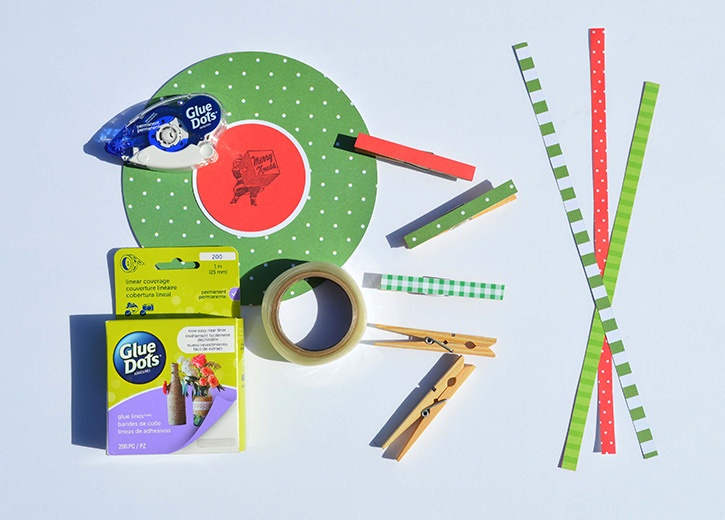
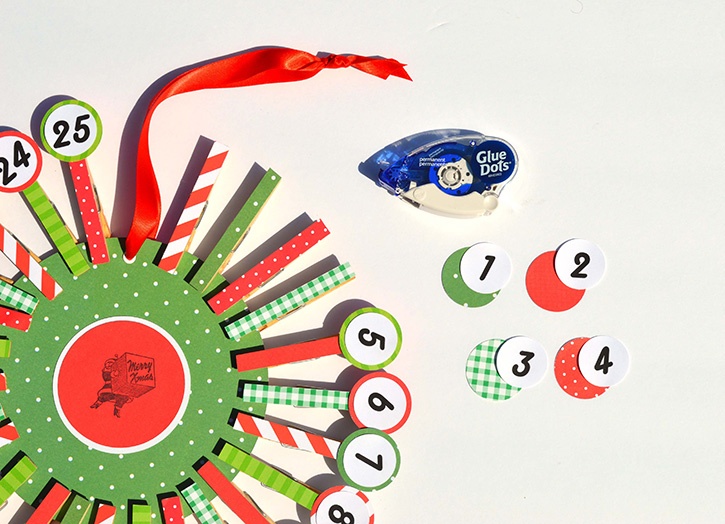
Print off (or create your own) the PDF of the count down numbers onto white card stock. Cut out the numbers using the 1.25” circle punch. Use coordinating colored papers and cut out 25 circles using the 1.5” paper punch.  Use Permanent GlueTape to adhere the numbers to the colored circles. Then, still using the GlueTape, add them to the ends of each clothes pin. 
Tip:  Remember to alternate patterns and colors before adhering them together.
At the top of the circle, insert an eyelet using a Crop-a-dial tool. Thread the satin ribbon through and tie a knot. This will be used to hang up your calendar.
country-chic-count-down-to-christmas-calendar-glue-dots-gluetape
Once you have all the pieces cut out for this project, younger kids and family members can help glue it together. Create memories as you make this calendar, and even more as you count down to the arrival of Santa Claus!
 ~ Dawn

8.29.2013

Happy Birthday, Katie!!

I'm a glad person that enjoys my birthday, every six months.
My fellow LBC Creative Team member, Katie, is having a birthday celebration today.  
Be sure to buzzzzz on over to wish her all the joy and happiness this next
year in life can bring her!


This lovely birthday card showcases the soft, pretty Buttercream Rumple Ribbon.
It is great for your cards that need a pale, not white white, ribbon.
Love making these flirty bows too!

It is actually my last official DT post for that company.
(Posted it a day early on my blog!)

I used Bo Bunny Apple Cider Papers, that are perfect for the upcoming fall season
of crafting and living!  Be sure to check out what the other Creative Team members
posted for Katie's birthday on the Lovebug Creations Blog.
And for more Gel-a-tins designs, check out the Company Blog.

8.21.2013

Christmas is coming!!

With summer winding down, it's time to start planning for fall and winter holidays.
So, I thought I'd show off a fun card using Groovy Santa from Gel-a-tins!


I used some great Swirl Glitter Papers from The Robin's Nest, so I thought I would carry 
on the glitter theme. 
I used the snowflake from this set to create a background.
Kalidescope Embossing Powder keeps it light and subtle.

Green Leaves Rumple Ribbon isn't just for the spring, summer, and out of doors. Just look what warm and cheer it can bring to your Christmas cards!  
Gelly Gems had a a belt of bling to tie it all together...Glue Dots © work great for these dots!


I hope you'll pop on by my blog, Sunnyside Up, to let me know what your
holiday crafting plans might be this year!

8.14.2013

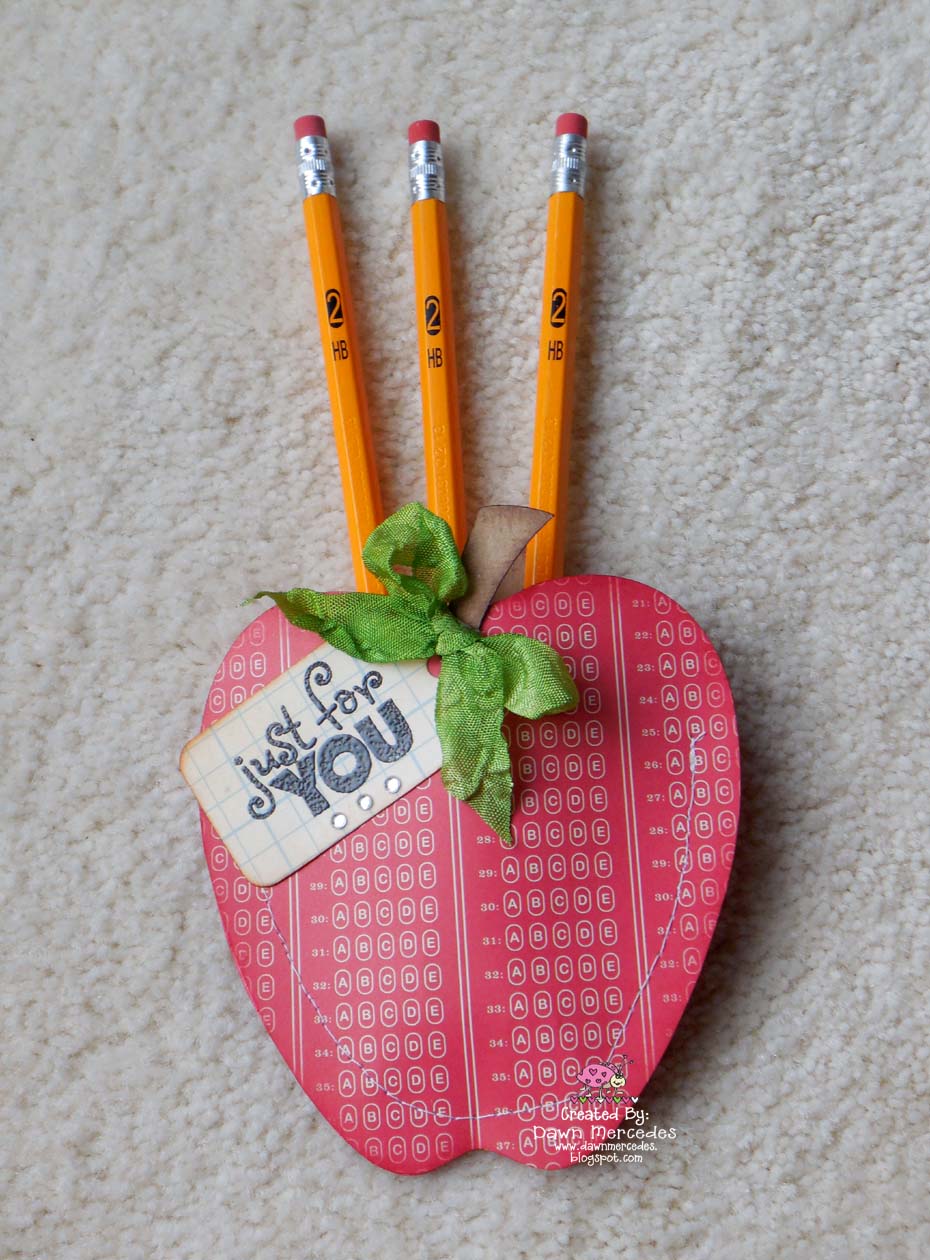
Apple Greetings


Getting ready to ship those kiddos off to school? 
Why not make a little pocket for them to tuck in their new pencils.
(Or gift to a teacher...who can never have enough in her stash!)

Here I used the Apple Treat Box svg file
from The Cutting Cafe.  Cut two apples and two stems. 
Just remember to "flip" the image if you are using printed paper 
so that your shapes are mirror images.
That way, they line up when you line them up.


Stitch around...or use Glue Dots ©.
Sponge the edges with ink for a vintage look.
I created a tag using Gel-a-tins: Make a Wish.

Green Leaves Rumple Ribbon is the perfect color for implied apple leaves!
Be sure to use Craft Glue Dots © to adhere the ribbon and tag.
Pile in some new #2 pencils...

And, your student, or teacher, will have a smile on their face every time 
they need to get out a new pencil!

8.12.2013

Bee Thanks


Another lovely thank you card.
This time, I chose to use silhouette images and a sentiment 


Wild Things stamp set has love flowers and insects.  
A few simple pearl halves dot the panel for interest and tie in some of that lovely
apricot color in a deeper shade.

The sentiment comes from Admission is Free.


To create the colored background, I used post it notes to mask the top and bottom edge
of the area I wanted to color.  First I scraped an apricot ink pad
across the middle portion.
Then, I scraped the pink and celery ink to either side.

I stamped and embossed the silhouettes in black.

Propped up the panel using Pop Up Glue Dots ©.
Then added a few pearls for interest.


7.25.2013

Pawsitively still smiling!

This sweet card using Gel-a-tins stamps: Cosmo Pups will keep you smiling too!  
Cute, simple, and perfect for almost any occasion!  


You are going to enjoy all the patterned pups.  This one is in damask.


I paired him up with a fun diamond embossing folder 
and cute silver rhinestones (a must), twine, and clippie.

What are you favorite embellies?


7.17.2013

Only takes one word...


Sometimes, it only takes one word to let someone know what you are feeling.
Any summer day should be one to celebrate!
Aren't the flowers refreshing?


To tie it all together, I used Goddess Green Rumple Ribbon
Very summery!  Very inviting!

Pop Up Glue Dots ©...a must for propping up flowers.  


Hey - D

 D- said...
I love your card and note holder. Love those beautiful colors. TFS.
By the way I am wild for Fun Footz.
D~
http://designsbydragonfly.blogspot.com

7.12.2013

Fun Footz...on the loose!


Welcome to the "Go Wild this Summer" hop 
featuring new ribbon patterns from
Lovebug Creations!

You should have prowled over here by way of the Exceptional Ellen!
If not, get back to the beginning to get a chance for all sorts of fabulous prizes!  
(More details below...keep reading!)


A flirty, fun Christmas in July card!  
I just love this Gel-a-tin's Groovy Santa...with the retro/non-traditional colors!
And that ribbon from the Chevron Junkie Collection sure adds pizzazz! 

And...why not add some pizzazz with your school supplies.
It's about time to start prepping for the next school year!


Here I coupled Chevron Junkie ribbon with Lemonade Rumple Ribbon.
Tart and sassy...


and perfect for that studious, fun loving girl!

I used Removable Glue Dots © to anchor a ribbon loop to hold 
a pen in place.  This post it note rests on a decorated 4 inch coaster.  
But, I think the festive clippie is the best looking part of this ensemble!

So... a few things to remember...

1.  Post on all the sneak peeks to get a chance for a $10 gift certificate to Lovebug Creations' store.
2.  Hop around and post your love on all the blog hop posts to get a change to win a $10 gift certificate to the Lovebug Creations' store.
3.  Post a comment on THIS post... saying that "I am wild for Fun Footz!" and you get a chance to win a $5 gift certificate to the Lovebug Creations' store from ME!

Feel free to follow my Blog or my Facebook Craft Page.
Thanks!!

Now...off you go to survey Candace's Creation!


The entire Entourage...don't get lost on this safari! 


Ellen ~ http://cardmonkeyspaperjungle.com/ You Prowled here already...
Candace www.papercraftsbycandace.com Surveying her creations NEXT!

7.09.2013

Animal Prints

The Robin's Nest has a variety of glitter-fied animal print patterns in stock!
And...20% off this month!

Animal Prints can be whimsical or classical/elegant.
It just depends on what you pair up with your print.  

Here is a whimsical fun, free standing pop cup card.


Collapsed View.
Check out those red Dew Drops!


Pulled out, free standing and paired up with the funny dogs from Gel-a-tins' "Cosmo Pups."
I "woof" those patterned pups!  Super fun and happy images!!

Paper: Glitter Paws from Robin's Nest
To put this fun card together, I used Glue Dots © 1 " lines, Craft, and Mini Glue Dots ©.
They really make craft projects come together neatly, and quickly.  
Check the tutorial I posted a while back if you want to make your own free standing popup card.

I chose to use Lovebug Creations William (in the Family Ties Collection) colored Rumple Ribbon for the ribbon pull.
Black, white, cardinal, and straw...
A fabulous color combo (especial for those Chi Omega sisters out there)!


But, if you want to go elegant, Black and White Animal Print is a great start for your paper crafting!


You can really see the shine and shimmer of the glitter-fied cardstock!  

Here I added the Kraft chipboard from Gina's Designs.
These laser cut chipboard designs are so well cut!

I sponged the edges of the bottles to create some depth. 
The primas were sponged to give them a more deeper, subtle color.

Don't you love the splash of the Red Glitter Paisley!
You will probably need some of that paper too.

The sentiment comes from Gel-a-tins "Admission is Free" set.
I love these timeless sentiments which will convey your message to the recipient!


7.01.2013

Your ticket to happiness

I have been enjoying Gel-a-tin's "Admission is Free" set.
Don't you just love how you can mix and match the sentiments
to create a fabulous, personalized card!


To create smooth ticket corners, I used a small circle punch.
A square,10 inch piece of paper is the base of this fun fold card.
The Lovebug Creations' Simply White Rumple Ribbon ties it all together.
It is simply the best ribbon ever!!


Inside view.

I thought this blue/green/orange color combo was such a fun birthday color combo.
What is your favorite combination of colors for a birthday day?

6.25.2013

Dazzling Diamonds and other Dew Drops...


Dew drops from The Robin's Nest are fun embellishments for your cards.
You can add color and texture and dimension!


First, I chose a simple shape and cut it out using a Sizzix die.  
Using Scraperfect's Best Glue Ever, I glued on different dew drop shapes 
in order to create a mosaic look for the front of my card!

Classified paper from The Robin's Nest makes a nice mat for the plain white card stock.

This month, the RN designers have linked up with Timeless Twine.


There are so many interesting ways to use twine. 
Wrap it around a panel...
or create a tail for a star!

Timeless Twine has yards of great colors to choose from!


Here I used Sorbet papers that have streaks of glitter.  
After adding my diamond dew drops, I stickle-fied the rest of the white card stock.
Not only does this help promote the "glitter look" of the card, it also covers up any glue smears. 
(Shhhhh! Secret!!)

Remember...Diamond Shaped Dew Drops are 20% off during the month of June.
Be sure to pick up a variety of shapes and colors!

Stamps used: Gel-a-tins

6.22.2013

Ticket Thanks


If you want a really fun set, you should pick up this "Admission is Free" set from Gel-a-tins!

It has so many options...
a variety of sentiments,
images...both line and solid,
a fun size,
and the tickets can be a nifty embellishment 
if you trim them up and prop them up on dimensionals!

6.14.2013

Dandy Day Greetings!


Here is a terrific technique that you will enjoy creating using your Gel-a-tins stamps and Gelly Acrylic Blocks!  It's super simple so you can create a great card in no time at all.

Start off with a clean Gelly Acrylic Block. Smoosh colored ink directly onto your block.  Here I used colors in striations.  Then, stamp onto a piece of paper.

Next, mask the edges of your color block with post it notes. Then, stamp outline stamps against the color block. Here I used Wild Things from Gel-a-tins.


Add a few extra bling or ribbon if you want.
Presto...You have a finished card!

Gel-a-tins has many great solid stamps to chose from...and many different sizes of Gelly Acrylic Blocks.


6.06.2013

Gel-a-tins mashes up with Xyron!


This week, the Gel-a-tinas are working with Xyron!  What a great adhesive to use on your paper crafting projects.  Today, I used the 2" Cheetah with Permanent Adhesive, as well as the Xyron Gluestick.


Tomorrow will be the birthday of one of my friends. I created this fun ensemble using Gel-a-tins: Cosmo Pups and Make a Wish Sets!  Such a cheery set of images and words!


A plain pad of white paper gets the birthday treatment!!  Lots of stickles...and my new favorite color of Rumple Ribbon:  Crazy Coral!  (Can there be a limit to favorite colors??)

The 2" Xyron Cheetah made applying adhesive a snap on such large paper panels.


Basically, a card stock cover with a pocket on the inside!


Note card that just barks "Happy Birthday!"


 And...to top it off...a book mark for her summer reads!
To get my poochies to lie flat, I applied the Xyron Glue Stick to the back of the cut out image.
(Remember to place it on top of a piece of scratch paper.)  Great coverage!!

I enjoyed this mash up...be sure to check the Gel-a-tins blog for more Xyron inspired ideas!


5.29.2013

Happy Tails

You are going to be wagging your tail over this darling set of puppies!
The Cosmo Pups set has a lot of charm and sweetness to it!


So many dogs, so many patterns, so many occasions...
I love the little added images of the paw prints and the bones.


Bark if you like this one...

Ruff!! Ruff!


5.21.2013

Clearly Stated


Just like any sign, you need to clearly state what you you are thinking...


And the stream-lined, sign-looking people in the "Home Sweet Home" set can 
help you get your message across.
Here, I used "Teal You Want" embossing powder 
and pieced the dress on this fashionable stick figure!

For more ideas using Gel-a-tins stamps, inch on over to the

5.13.2013

Spring Greetings!


Today', I am showing a card using "Easter Bunnies" by Gel-a-tins.
Just b/c it's Easter doesn't mean that you have to make an Easter card.
I simply cut up the phrases found in this set.
Arrange them in a new order on your acrylic block and you have more options!!


Super cute bunny...with rhinestones!

I hope your neighborhood bunnies aren't eating your tulips...
they sure are here!!


5.04.2013

Sending Messages


What sort of message do you send in your paper crafting projects?


I was inspired by the motif of this patterned paper with the word bubbles.
After cutting out this word bubble, the graphic couple from Home Sweet Home were donned in new clothes!  Another sweet, modern couple!


Stamp sets used:
SWAK, Home Sweet Home

I also used George colored Rumble Ribbon from Lovebug Creations.
This muted color works great with my color combo!  
For more inspiration using Gel-a-tins Stamps, check out the company blog!